Showing posts with label upcycle. Show all posts

Thursday, August 17, 2017

Christmas Configuration Boxes

Several folks have asked me how I make my Christmas configuration boxes (Shadow Boxes). So here is step by step directions.

First I purchase a vintage shadow box. I have found these at yard sales, estate sales and thrift stores. I'm lucky because a friend bought me two that are shaped like a house at a thrift store.


Next I gather the ornaments and Christmas decorations I want to put in the shadow box. That will help me determine the size of the divisions. I use a Dremel tool with a saw blade to remove the dividers I do not need. I always remove dividers from my configuration boxes because the spaces are just too small.


These are some of the items I have collected year round for this project.  I look for old Christmas light bulbs, vintage knee elves, old bells, old seals, putz houses, bottle brush trees, flocked Santas, plastic reindeer and more. 
After removing the dividers I cover the inside of each square in scrapbook papers that will blend with the item I am going to place in that space. I use white glue using a brush to spread it smoothly over the area. I use an exacta knife to cut the paper. You could also use a paper cutter. I cover the back and inside of each cell. 
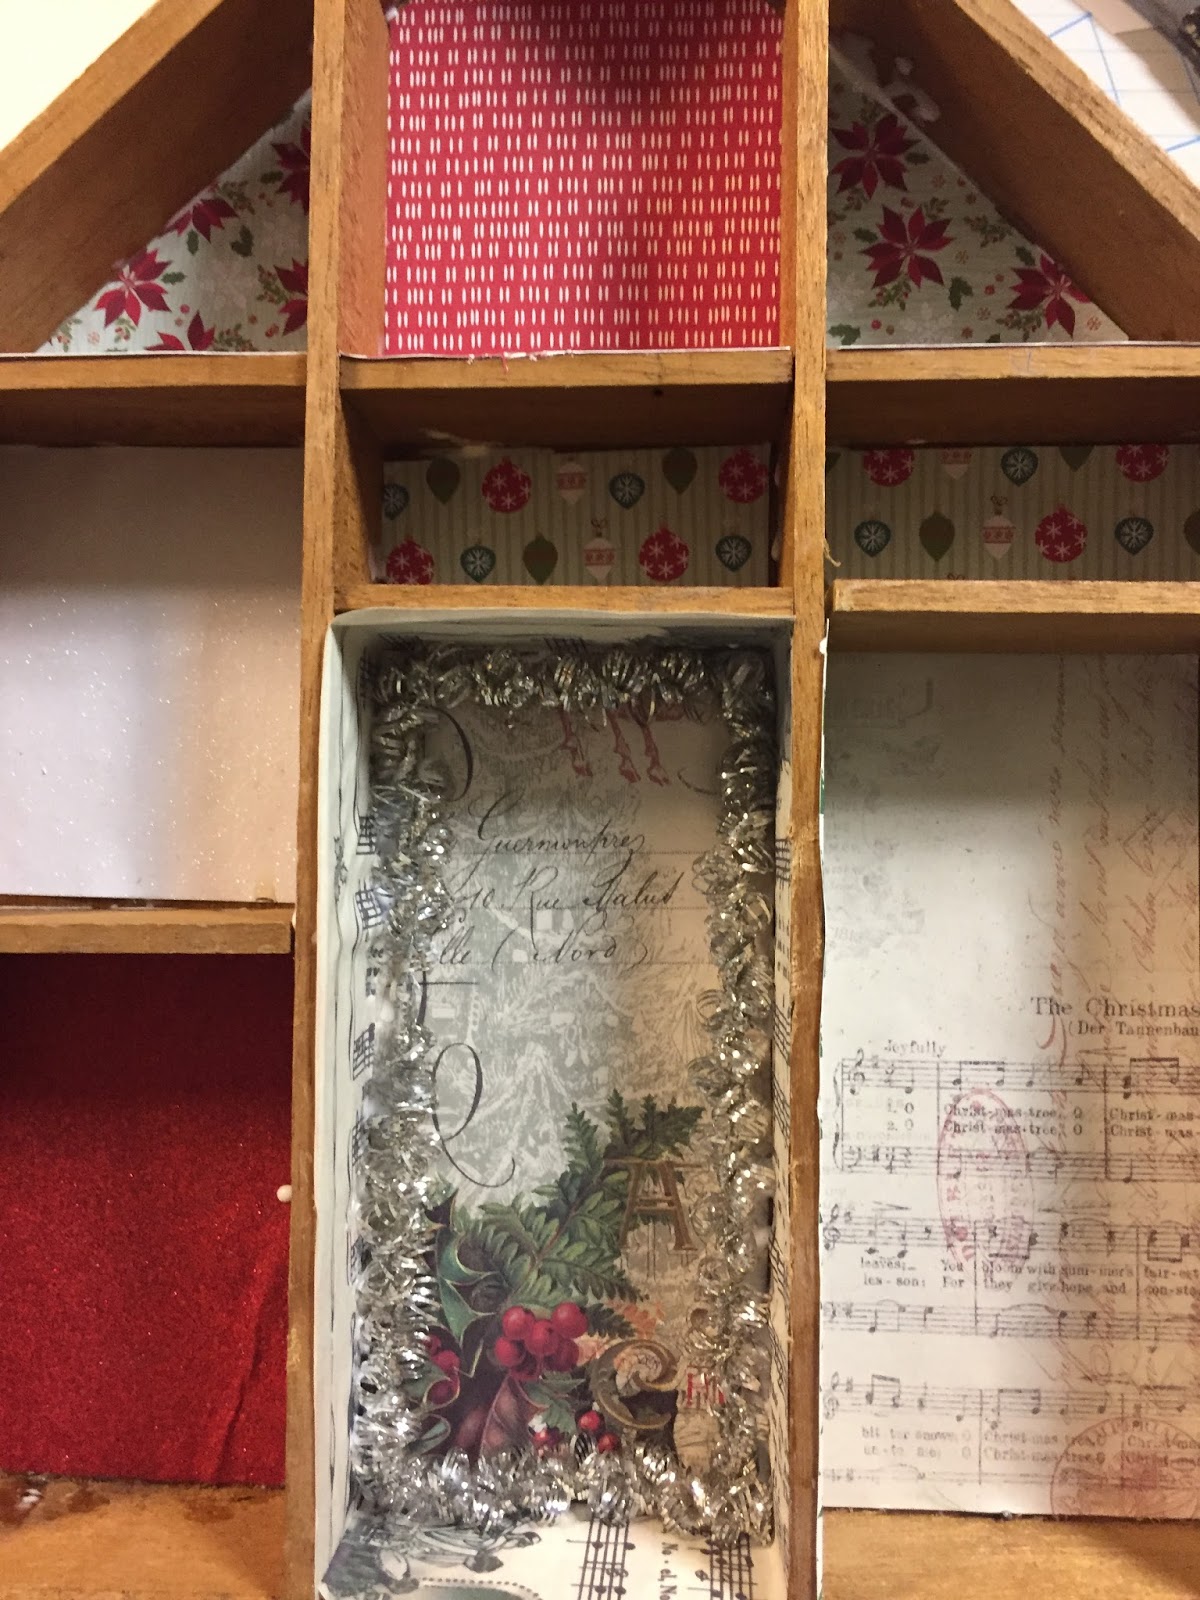
I also put vintage garland and Washi tape on the inside edges of some of the cells to add more detail.


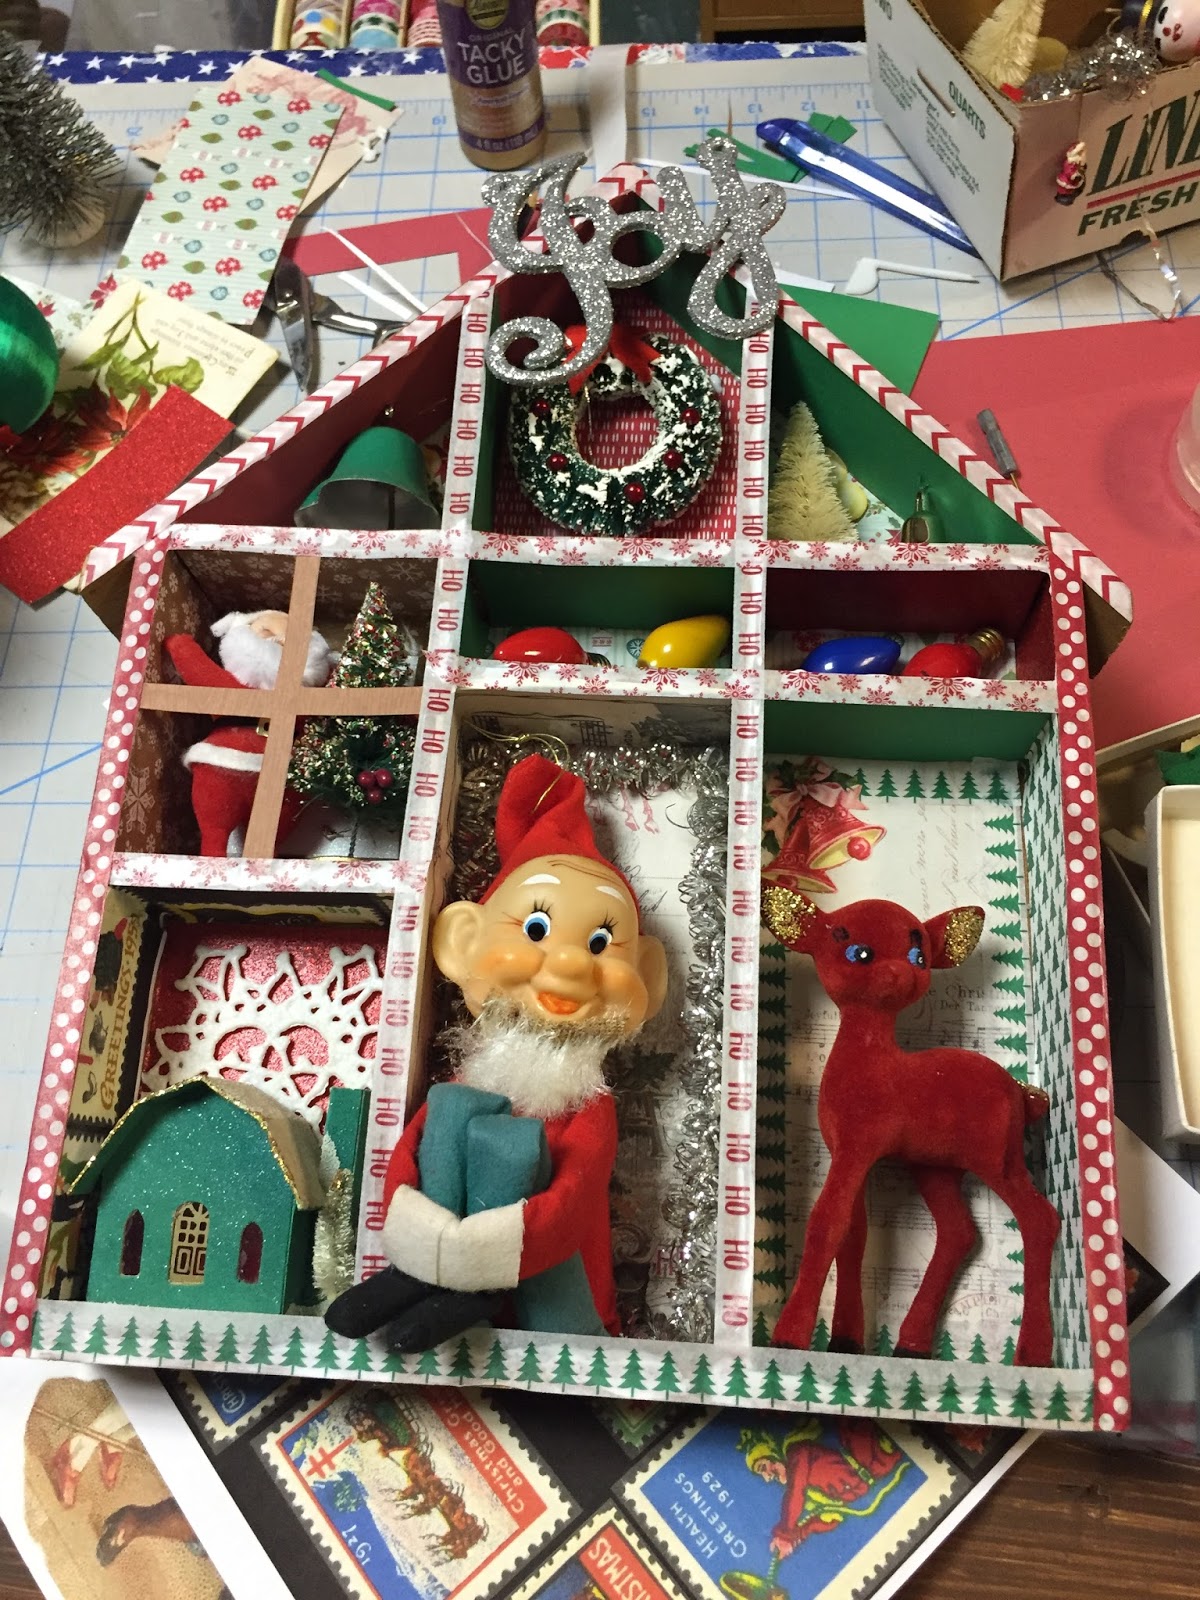
Next I put the ornaments and decorations in the cells. I use removable glue dots, white glue and even some hot glue to place the pieces in the cells. 


Next I cover the edges of each cell with narrow Washi tape. I love Washi tape but it is not the stickiest tape I have ever used. I brush white glue on the edges before placing the tape on it. 
Last year the local one dollar store had the cutest glitter cardboard Christmas ornament words. I bought as many as I could find before they got gone. I place one of these on top or in a cute place on the box. Here's my final piece. I really love it. 


Friday, August 4, 2017

Pumpkins from Jar Rings


I have a crafters heart. I used to have a craft business, and I actually sent my son to college on my crafting business in the late 80's. When I can, I create items for my booth that I have crafted from something vintage. In this case, it is these cute pumpkins made from canning jar rings. Here's how to make your own.


Materials:

18-24
canning jar rings
Washi tape in Fall or Halloween prints
White Glue
Twine
Burlap for Leaves
Stick for stem
Orange spray paint (optional)
*Not pictured
wax paper
dowel stick or pencil

Directions:
If desired spray paint your jar rings on both sides with orange paint.


When the rings are dry press the Washi tape on the outside of the rings. If the tape is larger than the ring, clip the edges and fold over to the top or trim the tape. You may need a little white glue to hold the tape down on the top of the ring.

Continue covering the rings until you have enough to create your pumpkin.


Thread twine through the center of the rings and tie securely. The more rings you have the larger you pumpkin will be. Spread the rings out until they are separately evenly.

Find a stick that is the size of the hole in the center of your pumpkin. Cut two leaf shapes from the burlap and glue to the bottom of your stick. I tie mine on with a piece of twine to secure until it drys.


To make the curls for the top take twine and dip in white glue.Wind twine loosely around a dowel stick or pencil wrapped in wax paper, and let dry at least an hour before removing from the dowel stick.


Glue the stick you chose for the stem of the pumpkin to the inside the pumpkin with white glue and add the curl.


You can get jar rings at any grocery store or variety store but I like to find used ones at estate sales.


Learn more about estate sales in my other blog posts.
Enjoy making your own pumpkins. Or you can stop by Goodson Vintage Treasures in Just Around the Corner at 120 East Main Street, Lincolnton, NC. and buy one from me!
Check our my Facebook Page or Just Around the Corner's Page.

Saturday, July 8, 2017

Letter? Letter? What to do with these letters?

Signs are all the rage now and I have quite a few in my booths. I also sell Scrabble tiles and tile holders, and they are great smalls to sell. Today we hit an estate sale in a nearby town. I had noticed on the photos they posted before the sale that this home had sign making materials and what looked like boxes of letters ( read my post on Junkin 101). Sure enough I found 3 boxes of letters at the sale, and I bought them all.


A huge milk crate full of black plastic letters.

A box of large orange letters 

Rest of the black letters on plastic and under them were red letters.
Now my dilemma is what to do with them. So naturally I went to everyone's favorite resource in this business....Pinterest. Here's a link to some projects I found.  https://www.pinterest.com/search/my_pins/?q=plastic%20sign%20letters
If you don't use it you should. First I found several links to Etsy. With those links I saw that some folks screw them to old white washed boards, hand them with clips on twine to make a banner and even create trays like in Scrabble to hold the letters. I love all these ideas and can't wait to try some them. Of course hubby will need to come up the the letter trays, but honestly he can do anything.

We also bought these old lead and glass flower frogs. I love these and use them around the computer as pencil holders and scissor holders.
Floral frogs make great desk accessories. 

We also purchased this small table. I'm going to paint it. Not sure what color yet. Suggestions are appreciated. I also found one bubble light and a roll of copper wire. We also stopped by a flea market and I bought some old Christmas post cards and some old gas station maps. All in all it was a fun morning and as usual I bought things I love. I'll blog about those letters when I do something with them.

Old Table
Update: Here is the first sign I made from my letters. I sprayed the red ones orange and mounted to a barn board. I love it. 

I hung this style on clips and sting. 


Sunday, June 11, 2017

Paper Dolls

Box of Vintage Paper Dolls
Did you play with paper dolls when you were little? Uh Oh I think I just gave away my age. When I
was young paper dolls were a popular toy. Last year I bought a box of old paper dolls at an auction. Hubby thought I was losing it, and I really had no idea what I was going to do with them. But as I always say, "Buy what you love." and I loved paper dolls as a child.

So for the last year those cute paper dolls sat on a shelf in the storage side of my basement, but in the back of mind they were floating around. I researched Pinterest a few times but found few ideas I liked. Then one day I decided to frame some of the dresses. I found an old shadow box type frame at a flea market to use. I took the art out of the frame and glued some blue scrapbook paper to the inside for a background. Then I took mat that came with the frame and spray painted it a contrasting color of orange. I chose a couple of cute 60's style dresses and glued them to the background. I spray painted the frame white and sanded it to give it a worn look. Finally I put the whole thing back together. I like the results.


A few days later I found another bargain shadowbox frame that was a little larger. This time I used some cute striped paper as a background and used some washi tape on the mat. Washi tape is a beautiful type of paper tape sold as most craft stores now. I chose several great old paper doll outfits to glue to the background. As before I painted the frame white and sanded it a bit.

For the next box I found a cute idea on Pinterest where they created a clothesline and hung the paper doll dresses on it. This time I took and old silverware box I had and found a frame that fit it. Then I painted both parts. I made a clothes rod out of a wooden skewer and attached it to the sides. I used pink scrapbook paper and another cute washi tape to cover the insides of the box as well as the mat. I made hangers out of craft wire and glued the clothing on it. On the skirt I used little clothespins. Then I attached the frame to box. In this picture on of the dresses is crooked but I can shake it an straighten it out.

The final paper doll item I created was a clothesline banner or garland. I used twine and glued a selection of vintage paper doll clothes to the twine. Then I tied the string in bows at the ends. I love how these turned out but with anything new I have no idea if they will sell. I'll keep you updated.


Tuesday, May 9, 2017

What's Hot in Collecting and Decorating


What's hot in collecting and decorating this month?


Gears, Wheels and Industrial Look
One new item I'm beginning to see and sell is industrial and farm machinery parts as wall decor. This is especially true for old and rusty wheels, gears and other machine parts. I purchased these mower wheel gears (according to the hubby) and another gear on the second day of an estate sale which means half price. I put them in my booth about 2 weeks ago and sold them today. I think they would look great in a man cave or an office. These are heavy so they will need to be mounted securely. I think they are a great industrial, farm look. 

Keep your eyes open for some objects that would make a great wall display at the next sale you attend. 

Saturday, May 6, 2017

Tobacco Stick Ideas

Tobacco Stick Stars Small in front Large on Right
In an earlier post I shared about Vintage Market Days I noted how I loved the ladders made out of tobacco sticks. Well, my handy hubby has created some more amazing items from the sticks we were able to purchase. First he made the ladders I wanted. I've already sold 7 or 8 in my booth. Then he made me the beautiful, huge star.  You can see it on the wall on the left in the booth. It's 48" wide. Now he has added a gate and a smaller star. Am I a lucky girl or what?

To make the smaller star he split the tobacco sticks into. He says this is easy to do. Then he made the

5 point star.It's about 15 inches across. If fact, splitting the sticks allows him to make two from the sticks he split as he can use both sides.
Check out Just Around the Corner  on Facebook where we have our Goodson Vintage Treasures booth.
Think outside the box to create up-cycled items from the things you love.
Tobacco Stick Gate

Wednesday, May 3, 2017

Scrabble Tiles in My Booth

I have been buying scrabble games when I find them for under $6 for months. I wasn't sure what I was going to do with them. I knew I could use a few in my configuration boxes. I'll make a post on them soon but they are a updated version of the old shadow boxes.  But I just got a new idea on what do with them.  I can't lay claim to this idea as it came from a comment Nolan Reynolds on the Booth Crush Facebook page. Her idea is to sell the tiles individually and with a tile holder.

So today I put my collection of tiles and tile holders in my booth in Just Around the Corner in Lincolnton, NC.  Nolan put hers in a big bowl but I put mine in an old wooden silverware tray I had. I love this idea an hope I sell some of them. I'll keep you posted on my success.

Remember, buy what you love and you will find a way to use it.


Tuesday, April 25, 2017

Tart Pans! 


Don't ask me why but I love tart pans! When I'm at an estate sale and I see a box or pile of old tart pans I just have to buy them. But what to do with them?

I've been searching Pinterest for the last six months seeking a neat way to upcycle them. I love the idea of making Christmas ornaments out of them, but I'm unsure of the success I will have selling them. Which, truth be know, I'm never really sure if something I created or recreate will sell in my antique and collectibles booths. 

But, this week I discovered the cutest little Christmas tree made out of tart tins. Here's the post from Thrity Rebel Vintage. Love it! Of course I will have to modify it because there's no way I would have enough sparkly jewelry to put on top of my tart trees for a star.   Tula from Thrifty Rebel Vintage used styrofoam balls between her tart tins. That just didn't work great for me. My first attempt was okay but not fabulous.
The foam balls melted with hot glue and wouldn't stay in place with the other glues. I couldn't get the tart pans to stay glued straight. I tried E6000, tacky glue and hot glue.  My second attempt was disastrous.Then I tried a combination of all three glues with no success. Styrofoam melts!


I switched to using a paper towel roll cut into small pieces instead of the foam balls and that worked a bit better on attempts three and four. But I still wasn't satisfied.


 I'm not one to give up easily so I thought about what I could use to go between the layers of tart pans. Then it hit me! Corks. So I sent out a call to my Facebook friend for some wine corks. Wow do my friends love wine. My sister-in-law came through first with a bag of beautiful intact corks.

So that's what I'm trying next. Check back and I'll update my progress. 

Besides my cork idea I also came up with an idea to add a drawer pull or knob (as we call them on the South) to the top. Of course a Christmas tree needs a star so I've ordered some 2 1/2 inch stars off of Facebook to add to the front of the knobs. I also added old wooden sewing spools (another find I can't resist) for a trunk. I'll post a pic of the finished tart pan trees in an update soon.


So folks the message here is again what I always say, "BUY WHAT YOU LOVE!" Keep researching and you will find a way to turn those finds into treasures.

Update: The corks work great. They are easy to cut as needed. I just sprayed them silver in case they show. The little arrived, and they are perfect. What a fun way to upcycle or repurpose tart pans.

FINISHED TREES....EXCUSE MY MESSY WORKSPACE

AREN'T THESE CUTE?